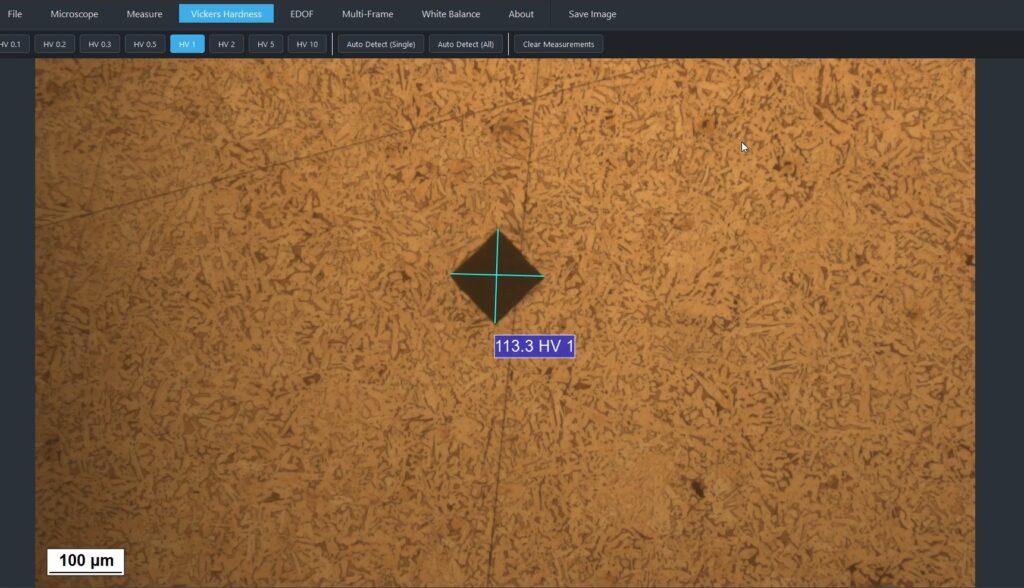
Integrated Vickers Hardness Testing with MicroVision Suite
Move beyond visual inspection and obtain quantitative material data directly from your microscope. Our software provides a streamlined, semi-automated solution for performing the Vickers test, turning your imaging setup into a powerful HV hardness tester.
What is the Vickers Hardness Test?
The Vickers hardness test is a widely used method for measuring the hardness of a wide range of materials, from soft metals to hard ceramics. The principle is simple: a diamond indenter with a specific pyramidal shape is pressed into the material’s surface with a known force.
After the force is removed, the operator measures the two diagonals (d1 and d2) of the resulting indentation. The Vickers hardness value (HV) is then calculated based on the applied force and the surface area of the indentation. A smaller indentation signifies a harder material.
This method is highly regarded for its accuracy and its ability to test both very soft and very hard materials using a single scale.
The Challenge: Manual Measurement and Calculation
Traditionally, performing a Vickers test involves several manual steps that can be time-consuming and prone to error:
- Visual Measurement: Using an eyepiece reticle to measure the two diagonals of the tiny indentation.
- Recording Data: Manually writing down the diagonal lengths.
- Manual Calculation: Using a formula or lookup tables to calculate the final Vickers hardness HV value.
- Transcription: Transferring the final value into a lab report.
Each step introduces a potential for human error, affecting the consistency and reliability of your results.
AI-Powered Vickers Hardness Testing
Precision Metallography. Automated When You Need It. Manual When You Prefer It.

MicroVision Suite is a professional metallography software platform designed for advanced Vickers hardness testing.
By combining deep learning, computer vision, and precision measurement tools, the software supports both AI-powered automation and traditional manual evaluation workflows — giving laboratories full control over their microstructure analysis process.
Vickers Hardness Testing Software
Automatic and Manual Indentation Measurement
MicroVision Suite integrates a custom-trained YOLO deep learning model for automatic Vickers indentation detection directly from microscope images.
The AI system can:
- Detect Vickers indentations automatically
- Identify indentation geometry
- Measure diagonals with high precision
- Instantly calculate Vickers hardness values
However, automation is optional.
Users can also perform fully manual indentation measurements using precision measurement tools, allowing:
- Manual diagonal selection
- Operator-controlled verification
- Independent hardness calculation
- Full analytical flexibility
This dual-mode approach ensures that laboratories can adopt AI-assisted workflows at their own pace while maintaining complete measurement control when required.
Key Benefits
- Faster hardness evaluation with AI assistance
- Manual override and verification capability
- Increased measurement repeatability
- Reduced operator-dependent variability
- Ideal for industrial quality control and materials testing laboratories
From traditional manual measurement to AI-accelerated hardness testing — the workflow adapts to your needs.
