

Microstructure analysis is often described as the “detective work” of materials science. By examining a material at a microscopic level, we can uncover its history: how it was forged, what heat treatments it underwent, and why it might have failed in the field. For a beginner, the process can seem overwhelming, involving complex chemistry, precision machinery, and advanced software.
This guide breaks down the journey of a metallographic specimen from a raw piece of metal to a comprehensive final report.
Step 1: Sectioning (Cutting) – The First Impression
The journey begins with removing a representative sample from the bulk material. The most critical rule in sectioning is avoiding heat. If you use a high-speed saw without proper cooling, you will create a “Heat Affected Zone” (HAZ) that permanently alters the microstructure you are trying to study.
Always use a dedicated metallographic abrasive saw with continuous liquid cooling. The goal is to obtain a sample with minimal surface damage to make the subsequent steps easier.
Step 2: Mounting – Getting a Grip
Small or irregularly shaped samples are difficult to hold by hand. Mounting involves encasing the sample in a plastic resin.
- Hot Mounting: Uses heat and pressure with resins like Bakelite. It’s fast and produces very hard mounts, ideal for edge retention.
- Cold Mounting: Used for fragile or heat-sensitive samples. You mix a resin and hardener and let it cure at room temperature.
Step 3: Grinding and Polishing – The Path to Mirror Finish
This is the most time-consuming phase. You are essentially removing the damage from the cutting step and replacing it with progressively finer scratches until they become invisible.
- Grinding: You start with coarse Silicon Carbide (SiC) papers (e.g., 240 grit) and move to finer grits (up to 1200 or 2000). Always rotate the sample 90 degrees between steps to ensure previous scratches are gone.
- Polishing: Once grinding is complete, you move to cloth discs using diamond suspensions (typically 6μm, 3μm, and finally 1μm). The result should be a “mirror finish” where the surface is perfectly reflective and scratch-free under 100x magnification.
Step 4: Etching – Bringing the Structure to Life
A polished sample looks like a mirror, but it reveals nothing about the grains. To see the microstructure, we must “etch” the surface using a chemical reagent.
Common etchants like Nital (a mixture of nitric acid and alcohol) react differently with different phases and grain boundaries. The boundaries reflect light differently than the grain faces, creating the contrast necessary to see the structure under a microscope. Tip: Always use safety gear and a fume hood when handling etchants!
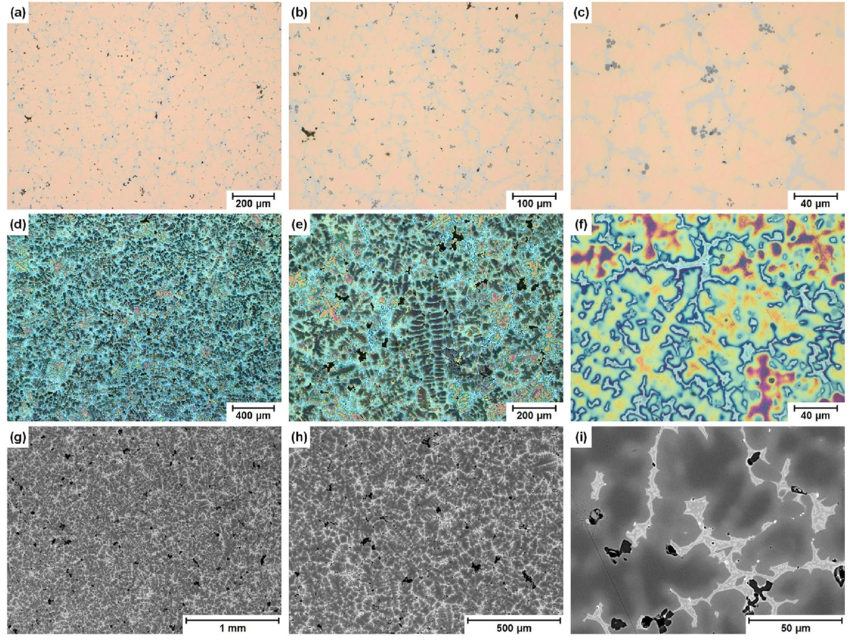
Step 5: Microscopic Examination and Analysis
With the sample prepared, it’s time for the microscope. For beginners, start at low magnification (50x) to get an overview, then move to 100x or 500x for detail.
In modern labs, we no longer just “look.” We use digital image analysis. This is where you apply standards like ASTM E112 for grain size or ASTM E45 for inclusions. Using software like Microvision allows you to automate these measurements, removing human error and providing statistically significant data.
Step 6: The Final Report – Documenting the Truth
The final report is the product you deliver to your client or supervisor. A professional metallographic report must include:
- Material Identification: Grade, heat number, and condition.
- Preparation Details: What etchant was used and for how long?
- Micrographs: High-quality images with a clear scale bar (never use “100x” alone as image sizes change on screens).
- Quantitative Data: Grain size numbers (G), phase percentages, or coating thickness measurements.
- Conclusion: A brief interpretation. Does the microstructure meet the required specifications?
Conclusion
Microstructure analysis is a blend of art and science. While the steps are standardized, the “feel” for the right etch or the perfect polish comes with practice. By following this structured path—from careful sectioning to digital reporting—you ensure that the stories the metal tells are accurate and repeatable.
Leave a Reply